
Connecting A Hard Disk To A Raspberry Pi
A Raspberry Pi can offer a quick solution to do some prototyping but if you need additional storage, an external hard drive can be very handy.
I was looking for a tool to store security camera feeds using a Raspberry Pi. Even if you’re just storing footage for a couple of days, an SD-Card is not a good option. It’s not so fast and it could fail overtime due to lots of write operations.
Following steps describe how to connect an external USB Hard Drive/SSD to a Raspberry Pi. I’m using an old Raspberry Pi-3 which unfortunately does not support booting from a USB Drive. So I still need to boot the Pi using a small SD Card (2Gb works just fine).
Here are the steps I took:
-
First prepare an SD-Card (min 16Gb) using the ‘Raspberry Pi Imager‘-tool.
-
Next steps require an external screen (connected via HDMI), an external keyboard and a mouse :
Boot the Pi and connect your external USB drive. I’m using an SSD drive because it’s faster and doesn’t need an additional power supply.
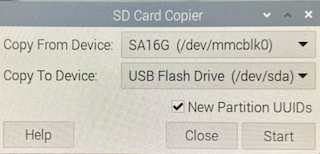
- From the menu : goto ‘Acccesories’ -> ‘SD Card Copier’
-
Select the source and target devices. Make sure to enable ‘New PArtition UUIDs’: This will copy the 2 partitions of the SD-Card onto the external USB drive.
- Reboot the Pi. This will automatically mount the external drive.
- Note down the PartitionUUID in the file ‘cmdline.txt’ from the /boot directory of the external disk. This is the PartitionUUID we want to mount when the Pi boots up.
- Now edit the cmdline.txt from the /boot directory and replace the root PartitionUUID to refer to the PartitionUUID from the external disk e.g.
console=serial0,115200 console=tty1 root=PARTUUID=a4cd54ec-02 rootfstype=ext4 fsck.repair=yes rootwait quiet splash plymouth.ignore-serial-consoles
- Reboot the Pi and verify the mounted file systems using the command ‘df -h’. If all went well, the external USB Drive should now be mounted as the root file system and the ‘/boot’ directory should be mounted from the SD-Card.
Finally if you want to use a small SD-Card (2Gb or even smaller) as boot device, you can do the following :
- Format the small SD-Card with a FAT filesystem (you can use Disk Utility on Mac or fdisk on Linux)
- Copy the boot partition from the SD-Card (16Gb) onto the small SD-Card using the command ‘dd’ (your devices might have different names) :
sudo dd if=/dec/mmcblk0p1 of=/dev/sda
- Finally edit the file ‘/boot/cmdline.txt’ to point to the correct root PartitionUUID.
As a result we only use the SD-Card to boot the Raspberry Pi. Everything else runs of the external SSD drive.